How Long Does Self Tanner Last? Tips To Extend Your Self-Tanning
by Paulette Leaphart
More than 1 in 3 adults in the U.S. regularly use sunless tanning products — yet most people have no clear idea how long does self tanner last once it's applied, or why it fades so unevenly. If your bronze looks flawless on day one and blotchy by day four, the product isn't the problem. The process is. This guide from The Scar Story's wellness and lifestyle community breaks down exactly what determines color longevity — and how to dramatically extend it.
On average, self-tanner lasts between 5 and 10 days. Some formulas, paired with the right routine, can stretch toward 12 days. Others start fading or flaking in 72 hours if your prep is off. That gap between a week-long glow and a two-day disappointment comes down to a handful of decisions you make before, during, and after application.
Your skin type, hydration habits, product formula, and application technique all factor in. Master the fundamentals and self-tanning becomes predictable — not a gamble.
Contents
Understanding How Self Tanner Works on Your Skin
The Science Behind the Color Change
Self-tanner doesn't work like makeup. It doesn't deposit pigment on the surface — it triggers a chemical reaction inside the outermost layer of your skin. The active ingredient, dihydroxyacetone (DHA), reacts with amino acids in dead skin cells to produce melanoid compounds that appear brown. This process mirrors the Maillard reaction — the same chemistry that browns bread in a toaster.
According to Wikipedia's entry on dihydroxyacetone, the color begins developing 2 to 4 hours after application and reaches its peak tone within 24 hours. Once developed, the color is locked into those dead skin cells. It will stay there until those cells naturally shed — which is exactly why self-tan fades on its own timeline, not yours.
- DHA concentration determines the depth of color — typically 3% to 15%
- Higher DHA concentration means deeper, longer-lasting color
- Color begins appearing 2–4 hours after application
- Full development takes up to 24 hours — don't judge results too early
Skin Turnover and Why It Matters
Your skin renews itself on a cycle of roughly 28 to 40 days. But the outermost layer — the stratum corneum, where DHA lives — sheds much faster. Dry skin sheds faster and more unevenly, which is why your tan looks patchy before it fades evenly. Oily skin tends to hold color more consistently and sometimes develops color faster than expected.
The skin on your knees, elbows, and ankles is thicker and drier than everywhere else. It absorbs DHA more aggressively — meaning those zones go darker faster and fade faster too. Plan your routine around this reality rather than fighting it.
The Right Products and Tools for a Longer-Lasting Tan
Choosing the Right Self-Tanner Formula
The formula you choose directly affects how long does self tanner last on your skin. Different formats have different DHA delivery mechanisms, absorption rates, and wear times. Here's how they compare:
| Formula Type | Average Longevity | Best For | Application Ease |
|---|---|---|---|
| Mousse / Foam | 7–10 days | Full body, deep even coverage | Easy |
| Lotion / Cream | 5–8 days | Dry skin, subtle color | Easy |
| Serum / Drops | 5–7 days | Face, customizable depth | Moderate |
| Spray / Mist | 5–7 days | Large areas, light coverage | Moderate |
| Gradual Tan Lotion | 3–5 days | Beginners, buildable color | Very Easy |
Mousse formulas consistently outperform the others in longevity. Their lighter texture allows for faster, deeper absorption and more even DHA distribution across the skin surface. If longevity is your priority, mousse is your starting point.
Application Tools That Make a Real Difference
Your bare hands aren't enough. The right tools eliminate streaks, reduce product waste, and extend wear time by ensuring even, thorough coverage every time.
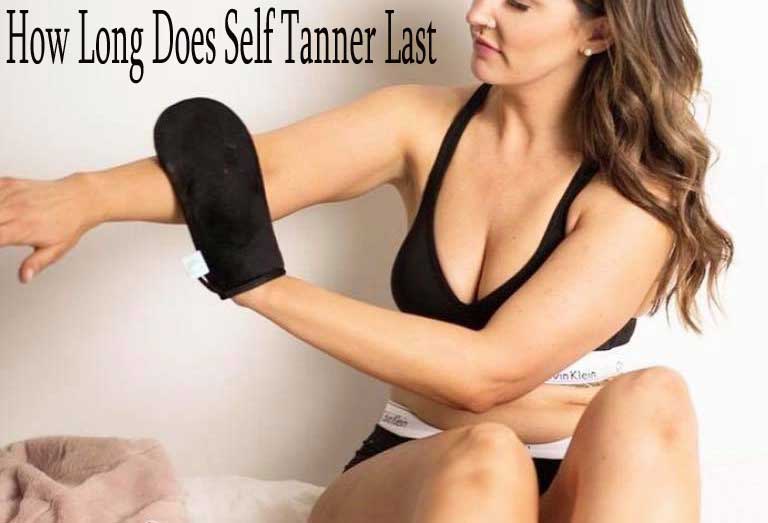
- Tanning mitt: Non-negotiable. Prevents orange palms and creates a seamlessly blended result. Use a fresh or clean mitt for every application.
- Exfoliating glove or scrub: Use 24 hours before application — never right before. It removes dead cell buildup so DHA contacts smooth, even skin.
- Body brush: Essential for hard-to-reach areas like your upper back, where uneven application is most common.
- Barrier cream: Apply to ankles, knees, elbows, and wrists before tanning. These zones absorb DHA more aggressively and darken unevenly without protection.
Pro tip: Always apply barrier cream to dry, thick-skinned areas like knees and elbows before tanning — they absorb DHA faster than the rest of your body and will turn noticeably darker if left unprotected.
For facial self-tanning, precision matters more than anywhere else. A wall-mounted lighted makeup mirror gives you the angle and lighting clarity to blend properly at your hairline, brows, and jaw — all the zones that most often look unnatural.
Habits That Are Sabotaging Your Self-Tan
Pre-Application Errors
Most self-tan failures happen before the product ever touches your skin. These are the prep mistakes that shorten wear time and cause patchiness:
- Skipping exfoliation. Uneven skin texture creates uneven color. Exfoliate 24 hours before — not immediately before — so skin has time to recover and settle.
- Shaving or waxing right before application. Open follicles absorb DHA unevenly. Shave or wax at least 24 hours in advance.
- Moisturizing immediately before tanning. Fresh lotion creates a barrier that blocks DHA absorption. If you moisturize, do it hours earlier — or limit it to barrier zones only.
- Not drying completely. Water dilutes the DHA reaction. Your skin needs to be completely dry before application starts.
- Rushing the application. Blending takes time. If you rush, you leave edges, overlap marks, and missed zones that show up once color develops.
Post-Application Mistakes
What you do in the hours and days after application determines how long your color actually holds. These are the most common post-tan errors:
- Sweating too soon: Wait at least 6–8 hours before exercising. Sweat disrupts the DHA reaction before it fully develops and can cause streaking.
- Long baths instead of quick showers: Soaking softens the skin surface and accelerates shedding. Lukewarm showers keep skin more intact longer.
- Using sulfate-heavy body wash: Harsh cleansers strip the skin barrier and fade your tan in days. Switch to a gentle, sulfate-free formula while your color is active.
- Skipping daily moisturizer: This is the single biggest mistake. A hydrated outer skin layer sheds more slowly and evenly. Apply a lightweight, oil-free moisturizer every day without exception.
Self-Tanner Myths You Should Stop Believing
Myth: Self-Tanners Always Look Streaky
This one gets repeated constantly — and it hasn't been true for years. Older formulas from the early 2000s were genuinely problematic, but today's DHA-based products are engineered for even distribution and controlled development. Streaks happen because of technique, not the product itself.
- Always use a tanning mitt — never bare hands
- Apply in circular, overlapping motions rather than long sweeps
- Blend immediately at hairlines, wrists, ankles, and behind knees
- Work in sections — don't try to do your entire body in one rushed pass
With a proper application technique and a quality mitt, streaks are almost entirely avoidable regardless of the brand you use.
Myth: Self-Tanner Only Works on Certain Skin Types
Self-tanner works on all skin tones — fair, medium, olive, and deep. The results look different because DHA interacts with your natural melanin levels. Deeper skin tones need a higher DHA concentration to see a visible result; lighter skin tones show color quickly even with lower concentrations.
The only real preparation variable is skin texture. If you have active dryness, post-inflammatory marks, or uneven texture, consistent moisturizing and exfoliation in the days before application makes a measurable difference. If you're working on overall skin evenness, an at-home facial routine can prep your face specifically for better, more uniform DHA absorption.
Honest Pros and Cons of Self-Tanning
The Real Benefits
Self-tanning has earned its permanent place in the beauty toolkit — especially for anyone who avoids UV exposure for health, sensitivity, or skin condition reasons.
- Zero UV damage. No tanning beds, no sunburn risk, no accelerated photoaging.
- Fast results. Full color develops within 24 hours — no weeks of sun exposure required.
- Controllable depth. You decide how dark through product choice and layering frequency.
- Confidence without compromise. A well-applied tan visually evens out skin tone, reduces the visible contrast of marks and imperfections, and creates a slimming silhouette effect.
- Year-round access. Works regardless of season, climate, or geography.
The Real Drawbacks
No beauty product is without trade-offs. Know these going in so you're not caught off guard:
- Ongoing maintenance. Unlike UV-based tans, self-tanner fades in 5–10 days and requires reapplication to maintain color.
- Development odor. DHA has a distinct biscuit-like smell while reacting with skin. It's temporary — typically gone within a few hours — but noticeable in enclosed spaces.
- Transfer risk. Fresh self-tanner can transfer onto sheets, light-colored clothing, and gym equipment for up to 8 hours after application.
- Learning curve. Getting a truly even, natural result takes practice. Your first few applications will teach you more than any guide can.
How to Fix a Patchy or Fading Tan
Addressing Uneven Color
A patchy tan doesn't mean starting over from scratch. Most uneven patches are caused by uneven skin texture, missed blending during application, or DHA buildup from a previous round. Here's how to fix it efficiently:
- Spot-exfoliate dark patches with a damp exfoliating mitt. Focus on knees, elbows, and ankles — these areas absorb the most product and fade the most dramatically.
- Apply a tan eraser or baking soda paste to stubborn concentrated spots. Leave it on for 2 minutes, then rinse. It lightens without stripping surrounding skin.
- Blend fresh product over lighter areas to even out tone before a full reapplication. This buys you extra days without a complete restart.
- Do a full exfoliation and restart if patchiness is severe. Layering fresh self-tanner over badly uneven color always makes it worse — not better.
Making Your Tan Last Longer Between Applications
If you want to extend how long does self tanner last between full applications, these daily habits add measurable extra days to your wear time:
- Apply a tan-extending moisturizer with low DHA (2%–3%) every 2–3 days to top up fading areas
- Pat skin dry after every shower instead of rubbing — friction accelerates cell shedding
- Avoid long soaks in chlorinated pools — pool water actively fades self-tanner
- Wear broad-spectrum SPF daily — UV exposure damages the surface skin layer and speeds shedding
- Reapply every 7–10 days for maintained, consistent coverage without buildup
If part of your goal is looking and feeling confident in what you wear, our guide on the best swimsuits for stretch marks is worth a read — because your tan deserves to be shown off in something you actually love wearing. And if swimsuit fit is a concern, the tips on how to shrink a swimsuit can help you nail the perfect fit before your next outing.
Your tan only lasts as long as you care for your skin — prep it properly, protect it daily, and the glow takes care of itself.


About Paulette Leaphart
Paulette Leaphart is a breast cancer awareness advocate and writer whose personal journey through diagnosis, treatment, and recovery shapes everything published on this platform. After experiencing the physical and emotional toll of breast cancer firsthand, she dedicated herself to creating a space where women can find honest information, community, and encouragement — covering beauty and personal care for people navigating treatment, fashion and style resources for survivors, and wellness content rooted in real lived experience rather than clinical distance.
About the Author

It's me Emily MacKenzie tried to make a documentary film about breast cancer according to the experience of Paulette Leaphart. Now it is no longer possible for some reason. But I'm not disappointed and I'm very hopeful that I can do something very positive that brings awareness to the women of the devastating disease ''Breast cancer". Just stay with me and keep supporting this platform; you will get update time to time and can know everything about ''Breast Cancer''.
You can get FREE Gifts. Or latest Free phones here.
Disable Ad block to reveal all the info. Once done, hit a button below